Showing posts with label Nineteenth Century Europe. Show all posts

Tuesday, December 9, 2014

Last Game at John’s


A few weeks back I wandered over to John’s for one last game in his beautiful new house… before he moved out of it!

We set up a game of Wargaming Nineteenth Century Europe 1815-1878 and, as per custom, I took the Austrians and John took Russians.

(I had secretly hopped he might bust out the Russo-Japanese war stuff – as our first game had been with those figures – but I’m not complaining, any game at John’s house is guaranteed to be a good time).


SCENARIO

We played the standard “Pitched Battle” scenario and, for once, actually ended up being able to set up on the long sides of the table. 

To win one had to be in possession of three of the four victory locations at the end of the fifteenth turn. 

In the “Pre-Battle Events” I rolled “Bogged Down” and lost two units. John rolled “Traffic Congestion” and three of his units would not arrived unit turn five.


FORCES

Austrians
6x Infantry
1x Skirmishers
1x Cavalry
2x Artillery
(One artillery and one infantry was lost due to pre-game events)

Russians
5x Infantry
1x Cavalry
4x Artillery
1x Cossacks
(I think an artillery, an infantry, and a cavalry unit were delayed)


THE GAME

(Remember: click on the pictures for a bigger version)


Initial set up from the Southeast – my Austrians are deployed on the south edge of the table.


Initial set up from the Southwest.


Again with the initial set up – from the Northwest.


The Austrians begin their advance.


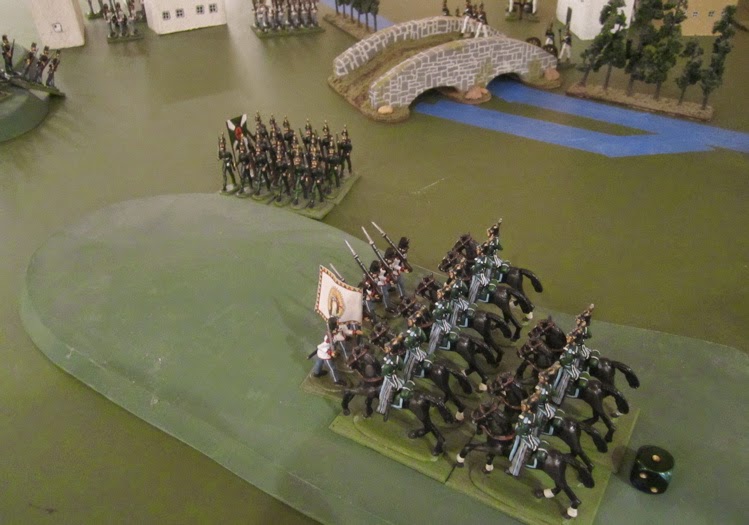
On the second to third turn the Austrian cavalry clashed with Russian infantry…


… nearly pushing them right off the table with the first clash! I tried to take the battle to the Russians as I know I would only have slight numerical superiority for the first five turns…


So fast was my advance that my infantry overran Russian guns before they could even get set up on the hill! Huzzah!


The remnants of my cavalry fleeing from their second clash with the Russian Infantry west of town.


In the foreground I have three Infantry units converging on the town – one of the victory locations (of which there were four..? Two hills and two villages?). Another Infantry unit is eyeing up one of John’s units across the bridge spanning the river wondering how they’re supposed to cross that thing according to the rules. In the distance I have a unit of cavalry and a unit of artillery facing some Russian Cossacks. Oh, and my Skirmishers are on the wooded hill sniping at some of John’s infantry on the outskirts of the village on the other side of the river.


Russian Cossacks charge and overrun my guns.


The Russians finally decide the best way to go about crossing the bridge is in column of march!


This leads to their near annihilation at the hands of my deployed infantry.


Austrian infantry sweep down off the hill and smash through the wavering Russian line.

Then I got kind of lazy with the picture taking… all these were taken BEFORE the fifth turn when The Russians reinforcements show up… the next pictures are many turns later…?


That full strength Austrian unit that was holding the bridge…? Yeah, that’s them not backed up to the hill (another victory location) being charged by Russian Reserve Cavalry That cam one on the fifth turn and galloped all the way around the flanks to try and take that hill in my rear. The Russian Infantry that’s just crossed the bridge is one that also came on from reserve. The Russian gun set up just on the far side of the bridge is also one that came out of reserve on the fifth turn.


John and his fabulous game table full of toy soldiers (with bubblewrap for the immanent packing in the background!)


The remains of the unit of Russian Cossacks (after charging down the gun) They kind of held the extreme left of the Russian line and mostly just hung out to make sure my skirmishing Grenz didn’t try to pull anything funny as some of his other troops pulled out of their positions opposite to go and try to reinforce their wavering right.

The Russians are always supposed to get 1-2 free units of Cossacks – this is the first game we actually got to play with them (as John hadn’t has any for our previous games)!


The end of the game.

I think technically the Austrians won. They held a village and the wooded hill. The Russian held the other village but this hill was still somewhat contested at the end of the fifteenth turn. I didn’t take note of the losses at the end of the game – but it was a pretty bloody battle and I don’t think the Austrians would have been able to hold onto their victory locations for long had it continued...

Good times. I’m going to miss these games. Hopefully I’ll get John over here for a game or two before he takes off for good.


Coming soon on Tim’s Miniature Wargaming Blog:

I did get a bit of painting done over the weekend. Mostly Medieval subjects… but there’s some more Great War stuff on the workbench…

This week I hope to get in a game of Galleys and Galleons – so stay tuned for that report! 

Wednesday, January 8, 2014

Wargaming Twentieth Century Manchuria?


I went over to JohnB’s place Tuesday evening to play some Wargaming Nineteenth Century Europe 1815-1878 but we ended up playing something more like Wargaming Twentieth Century Asia c 1905! John busted out his old homemade 25mm Russo-Japanese War miniatures (the same ones we used the very first time we played a game!) and with a few tweaks to the rules we were on our way! 

Manchuria, 1905

SCENARIO

We played the Rearguard Action Scenario. The Attackers would essentially have twice as many units  - both forces being randomly determined by rolling on respective tables in the book. The attackers had 15 turns to get at least five units off the far end of the table – though only four units would start on the table – the rest  were in reserve columns of two units each and would have to be diced for.

FORCES

Japanese

5x Infantry
3x Cavalry
2x Artillery
2x Machine-guns


Russian

2x Artillery
1x Cavalry
2x Infantry
1x Machine-gun.


THE GAME

I took the Japanese and was attacking. John took the Russians and was defending.

(Remember: click on the pictures for a bigger version)


John could pretty much three quarters of  the table as his deployment zone.  He spread his units along a ridge of hills.


Russian Artillery Battery and Infantry battalion.


Another Russian Artillery Battery and a Regiment of Dragoons.


The other Russian Infantry Battalion and Machine-gun battery – with the rest of the force in the background.


On the first turn my initial forces marched onto the table. The Infatry I decided to drive up the right flank – as the middle and left was dominated by the Russian artillery.


On the left I brought on the guns – hoping ot keep his own guns busy and maybe silence them before giving my advance some support from the flank.


Turn Two – the rest of my guns arrive. On John’s first turn he clobbered my first battery of guns.


A view from the Russian side on Turn Two


Another view from the Russian perspective.

As my second battery came on they were also pounded by his guns – but my first battery opened up with some counter-battery fire.


The lead infantry battalion charges over the crest of the hill and into the attack!


BANZAI!


The Japanese being mauled on the way.


Follow on battalions moving up.


Though they took some hard knocks on the way in the Japanese prevailed in the attack and drove the Russians off the hill and swept away their machine-gun unit!

BANZAI!!


Once the first Russian battery was silenced, the two Japanese batteries moved up into range of the second. As they had taken some serious casualties from their duel with the first, one of Japanese Battery was quickly finished off, but the remaining one stayed in the fight for another turn or two to exchange shots with the remaining Russian battery.


Fire from the Russian infantry battalion finished off the first Japanese battalion – but the second one following immediately fell upon the beleaguered Russians!


They too were mauled by the Russians – but the Russians kept falling back and fresh Japanese troops gave chase.


Somehow I missed getting a picture of the Russian Dragoons before they were cut to pieces by the shattered Japanese infantry battalion and their supporting machine-guns.


The Japnaese continue to pursue the Russians ever closer to their own table edge. For a few turns I failed to get my reinforcements – soon they would not have enough turns to make it across the table!!


Another Japanese battalion moves in for the final assault on that first Russian battalion – while another Japanese battalion maneuvers to engage the other Russian battalion.


Finally the remaining Japanese Infantry battalion and the first of the cavalry units arrived and made it over that first hill.


Pushing forward taking artillery fire from the flank.


The first Russian Infantry battalion is finally broken – they sold themselves dearly, though – taking out twice their number before finally breaking under the relentless attacks of successive Japanese battalions.


Getting near the end…

That’s all I got for pictures…?

I did get four units off the table. I think one unit of my cavalry was wiped out. Another unit of cavalry was just an inch or two shy of being able to make it off on the very last turn… a hard fought battle to the end!

I think this is going to work out very well for some 1914 battles when we get enough figures painted.

Coming soon on Tim’s Miniature Wargaming Blog:

Painting toys – a bunch arrived today, including figures foe the second Sohei buntai from The Assault Group and an order from Perry Miniatures to fill out with … and … - that I only just placed on the second – that’s less than one week from England to Saskatoon, Saskatchewan Canada! Wow!? I have a few to convert – so I’ll get cracking on that shortly and I also brought home some 40mm 1914 French infantry from John’s to paint up… 

Sunday, September 22, 2013

Wargaming Nineteenth Century Europe at Toon Con


Saturday afternoon I helped my friend John run a game of Wargaming Nineteenth Century Europe 1815-1878 at  ToonCon.

There were actually four players for this so John and I kind of jointly ran the game. Gary and Rick played the Russians, and Keith and Bob (who drove up from Regina in the morning just to play this and my Force on Force game).


SITUATION

1850 – the War rages in Galicia! Finally the two armies have located each other and come to a place where they have no choice but to face each other in open battle!

SCENARIO

We finally decided to play a Pitched Battle scenario – where all the forces start on the table (so far we seem to have only played the Meeting Engagement scenario where only three units on the table and the rest are diced for at the beginning of each turn).

All forces were to be deployed on the table at the beginning of the game. To win two of the three objective had to be occupied by the end of turn fifteen.

FORCES

The forces were diced for. Here’s what they ended up with:

Russians
5x Infantry
2x Cavalry
3x Artillery

Austrians
4x Infantry
2x Skirmishers
2x Cavalry
2xArtillery

THE GAME

(Remember: click on the pictures for a bigger version)


Gary and Rick deploying the Russians


Gary and Rick in the back still deploying their Russians while Keith (on the left) and Bob on the right, whose Austrians are already deployed and ready for battle, listen to John explaining some of the rules.


The Austrians


The Russians


Austirans again. There were allowed to deploy three of their units a little ahead of the rest which effectively put them in control of two of the objectives from the get-go!

Austrian Skirmishers advancing towards the Russians guns.


I guess thos skirmishers didn’t realize how quickly those guns could get unlimbered and what a devastating volley they can throw out at such close range. This was the last we saw of that unit…


The Russians occupying one of the towns and one of their cavalry units reeling from their first contact with the (freshly painted) Austrian cavalry.

And there is said (freshly painted) Austrian cavalry…. Hmmmm… maybe the Russian cavalry had taken some fire from the Austiran Guns…?  This doesn’t seem to be the position the Austrian cavalry would have been in after a engagement with those Russians? Perhaps part of the Russian unit just fled when they saw the approaching Austrian cavalry knowing that they were DOOMED.

Actually now that I think about it, it was probably the combined fire of the Russian guns and the Austrian Skirmishers. (But we’ll just say it was them fleeing before the might and shininess of the (freshly painted) Austrian cavalry.


Rick and Gary making plans.


(freshly painted) Austrian cavalry again holding the right of the Austrian line… frightening away Russians of all manner… Seriously, look at them – the entire force is heading away down the other edge of the table – trying to get to the FURTHEST objective – which is held by two battalions of Austiran infantry – rather than face down the (freshly painted) Austrian cavalry.


Russians infantry fleeing the (freshly painted) Austrian cavalry. (I’m having too much fun… is anyone even reading this or are you all just looking at the pretty pictures… I’d just be looking at the pictures!)

Oh and there’s another cavalry battle going on here. Russians have just recoiled from the other Austrian cavalry unit. This went back and forth for a few turns. I think ultimately the Austrian cavalry was forced back into their guns and destroyed. Then the Russian cavalry thought they’d be able to ride down those guns that were unlimbered and facing towards them and not even half a league away!?


Rick and Gary making more plans…


The Austrians have a nice line diagonally across the table securely holding two objectives. The Russians are still trying to figure out what they are doing and maneuver around the town – away from the (freshly painted) Austrian cavalry.


Ah here we go – the remnants of the Russian cavalry about to make their valiant charge into the mouth of the Austiran guns. So valiant. Poems will be written about them… well… maybe a limerick..


Now they’re getting somewhere. Russians trying to deploy in something resembling a line while the Guns hammer away at each others troops.


There they are, the finally figured it out – The Russian all deployed in a nice straight line like they were taught on the parade square.


Facing the solid well-drilled Austrians (who were taught more than one formation).


Then one of the (freshly painted) Austrian cavalry horses whineied and all the Russiand fell out of line and made a dash for the safety of the village, which, unfortunately for the Russians, was already occupied by Austrians… but they weren’t thinking of that – they only wanted to put as much distance and buildings between themselves and those (freshly painted) Austrian cavalry.


Things looking a little sparse on the Russian side. In short order the Austrian infantry in and around the village (supported by their artillery when possible) cut down the forward fleeing Russians – as you can see there are only two of the four battalions remaining.


Steeled up by drinking all the vodka they could find in the village the Russian cavalry rode out to meet the (freshly painted) Austrian cavalry.


Anotherr picture of the (freshly painted) Austrian cavalry. They’re just so shiny and new… The Russians were probably blinded by them.


The Remnants of the Russian cavalry fleeing from (freshly painted) Austrian cavalry… Those Russian cavalrymen… they are mighty belligerent, and somewhat lacking in common sense, when drunk! That single remaining stand of Russian cavalry charged back into the fray on the following turn. So appalled by the smell of the drunken louts the Austrian cavalry had to ride off and get some fresh air before riding the last of them down in the following turn.


Meanwhile the last of the Russian infantry – that had been hiding out in the village looting and raping the locals and drinking all the vodka that they Cavalry hadn’t ridden off with – sallied out and made a last ditch effort to take the hill (in the previous couple pictures you can see them doing so in the back ground). At this point they’ve been reduced to a single stand and had two Austiran units firing on them from the front and Austrian Cavalry about to ride them down from the rear…


Here’s how things looked with the Russians packed it in at the end of Turn Fourteen.

Finally a decisive victory for the Austrians! It’s handy to have your army on the table BEFORE… oh… Turn Seven!?

I like this game. It's simple enough for a big dummy like me to understand.

I think the game went over really well. Everyone seemed like they were having fun and remained civil throughout the game. No items were thrown across the table in anger! Thanks to John for bringing his beautiful toys out and thanks to Gary, Rick, Keith and Bob for making this a thoroughly enjoyable game. 

Coming soon on Tim’s Miniature Wargaming Blog:

Back to painting – but hopefully I’ll get some more games in in the coming weeks. The Force on Force game really got me stoked to play more of that – as I haven’t played it in a while. Maybe it’s time to try some of the OTHER scenarios in that book! I’m also keen to have a go at Tomorrow’s War - using some of the Sci-fi figures I’ve been painting up lately.